Sheet Inputs
General Model Assumptions
To start a new plan, click the "New Planning - Erase all input data" button (see macro button in the screenshot below). This permanently clears all input data and cannot be undone. If necessary cancel and save the workbook before continuing. This macro operation can take 20-30 seconds to erase data across all sheets.

The input fields in the section "Names and Information" (“Legal Form” through “Last Update”) are for information purposes only. The link to the cover sheet and the top of each sheet.
To be as flexible as possible, Excel-Financial-Model allows for changing between UK/International or US/Canadian accounting formats and terminologies. The main differences relate to spelling (labour vs. labor for example), terminology (see table below for examples), and the accommodation of taxes on sales, valued added (VAT) and goods & services (GST). Note: Printer page sizes (European A4 vs. US Letter) must be set individually within Excel according to your needs. Selected differences between UK/International and US/Canadian terminology:
This feature is implemented by using Excel’s CHOOSE function. Syntax: CHOOSE(index_num, value1, [value2], ...) with index_num being the named cell “language”. This argument can be 1 or 2. If index_num (language) is 1, CHOOSE returns value1 (= UK Terminology); if it is 2, CHOOSE returns value2 (US Terminology); and so on. Example: =CHOOSE(language;"Profit and Loss Statement";"Income Statement") Flexibility is high priority within Excel-Financial-Model, you may change the terminology or add additional text as needed. |
You can define different currencies codes or symbols (GBP or £, USD or $, EUR or €, etc.) and denominations (1 or 000s). Currency inputs are independent of your language settings (UK vs. US). We recommend the international standard three-letter ISO 4217 currency codes (EUR, USD, GBP, AUS, etc.). For more information:
|
In this section, enter a start date and the planning horizon. The start date has to be the first day of a month. Otherwise, you will get an error message. Fiscal Year It is possible to define fiscal years (FY) which differ from calendar years (CY). In this case use input cell “Last month of financial year” to choose a specific timing. In case the input value is December (Month 12) fiscal year and calendar year are the same. The terms “fiscal year” and “financial year” are synonymous. They both refer to an accounting period of 12 consecutive months beginning on a date other than January 1. However, to qualify for a different fiscal year, you must meet certain requirements, depending on country-specific laws. We cannot give any advice at this point, as this would go beyond the scope of this manual. Tax year A tax year is the accounting period you choose to calculate your income and expenses for taxation purposes. In the current version of Excel-Financial-Model the tax year always equals the fiscal year (i.e. if you set the last month of the fiscal year to December => fiscal year = tax year = calendar year). Planning Horizon Excel-Financial-Model allows for a maximum planning horizon of 5 Years (start year plus max. 4 additional years). Depending on the start date and fiscal year you have entered, the first year may be a short (less than 12 months) business year.
|
Products and Services
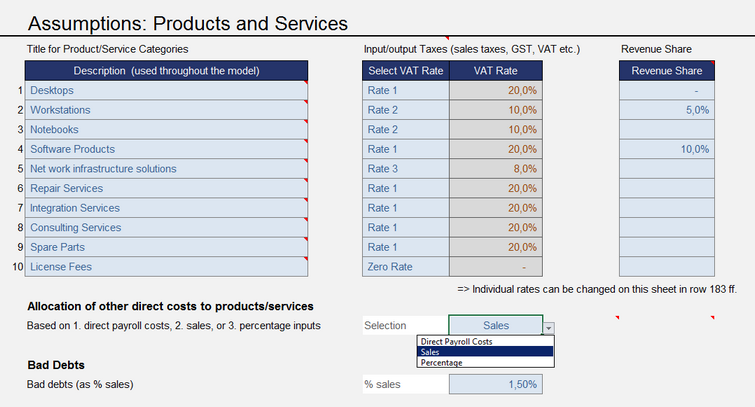
In this section basic assumptions regarding sales will be entered. For up to 10 different products/services a description can be defined. These names will be used throughout the complete model. However, the detailed monthly sales forecasts (quantities and sales prices) for each product/service will be defined on sheet “Sales”.
When using input/output taxes select the appropriate rate. In case you are planning without VAT, GST or Sales Tax, set rate to “zero rate” for each product/service (for more details on input/output tax settings see paragraph taxes => “VAT / Sales Tax”). In addition for each product/service a specific revenue share in percent can be entered. The percentage of revenue entered here will go to the partner, agent, broker, service provider, platform etc. |
You may optionally globally determine bad debts as a percentage of sales within this input section. Sales receipts and input/output taxes (sales taxes, GST, VAT) are automatically adjusted to take the bad debt percentage into account. The cost of bad debts is treated as an expense in the income statements (P&L). Monthly sales forecasts (quantities and sales prices) for each product/service are defined on the “Sales” sheet. |
Human Resources
This section covers basic assumptions regarding personnel expenses. Enter employee names or clearly-identifiable descriptions for each position in up to 5 divisions (Direct Labor Staff, Management & Administration Staff etc.).
Enter a base salary (for the first planning year) and an appropriate annual raise (optional) for each employee/position. If necessary you can also overwrite formulas in the years following the base year (see tip below). Note: The base salary always refers to a period of 12 months (= annual salary), without income taxes and social insurance, even if an employee is only expected to work a few months of a year. Do your detailed staff planning (monthly deployment schedule) on the “Human Resources” sheet.
|
Fill in a percentage (of base salary) for income taxes and social insurance. It is possible to turn on/off the calculation of Social security contributions and taxes for each employee/position on the “Human Resources” sheet. |
For each division assumptions for additional staff costs can be entered. Apart from the first row item (“Recruiting Costs (one-time upon hiring)”) descriptions can be changed according to your needs. Note: Pay careful attention to the units (column E) of each row item (e.g. USD/FTE/month vs. % of base salary etc.). If you change a unit, the formulas on the “Human Resources” sheet need to be edited accordingly (recommended only for experienced excel users). |
Financing
One of Excel-Financial-Model’s main USPs is its implied funding waterfall. This is an ordered cascade of equity and debt draws with alternative funding priority.
As with modelling any cash flow waterfall, the process is expedited by calculating the monthly deficit cash flow, setting up criteria for the maximum amount of equity and debt that is still available for funding and making all calculations regarding fees, interest, repayments etc. to get the associated balance sheets accounts.
The model consists of the following capital funding elements (= sources) which are used in a defined order: Two equity tranches and (up to) five different debt tranches.
Initial EquityFor the first equity tranche (= initial equity) you have to decide whether the full amount should go into the model in the first month (select “Yes”) or if you prefer a draw down on an as-needed basis. In the latter case the amount entered in “share capital” can be understood as maximum and may not be fully needed (if the total funding requirement is less).
Additional EquityFor the second (optional) equity tranche (= additional equity) you can enter an amount and the date the money will be made available (see above screenshot).
|
Four different loans (debt tranches) and an additional automatic overdraft facility are included in the funding waterfall. Debt 1 to 4The first loan (debt 1) is a fully automatic annuity. The regular payment interval (interest & principal repayment) can be freely selected (monthly, bi-monthly, quarterly, semi-annual, and annual). This debt can be switched on/off at any time by “one click” and allows for automatic coverage of capital requirements up to the maximum debt limit. While using this mechanism you see the direct impact of any change in assumptions on the capital requirement (e.g. when running different scenarios). If debt 1 has been switched on you can enter the following assumptions:
Debt 2 to 4 are identical structured apart from their hierarchy in the funding cascade. On the “Inputs” sheet, you can assign a facility description for each loan and decide whether interest should be calculated automatically. In this case, enter an interest rate. If you prefer to enter interest payments manually, enter them directly on the “Financing” sheet. You must always enter loan disbursement and repayments for debts 2 to 4 on the “Financing” sheet. Overdraft Facility / Current AccountFor the current account, you can set up a maximum overdraft (set to zero or leave blank if not used) and an interest rate. The overdraft facility comes at the end of the funding cascade. If liquidity is available, the model automatically uses it for highest possible reduction of this “expensive” credit facility. |
Other Assumptions
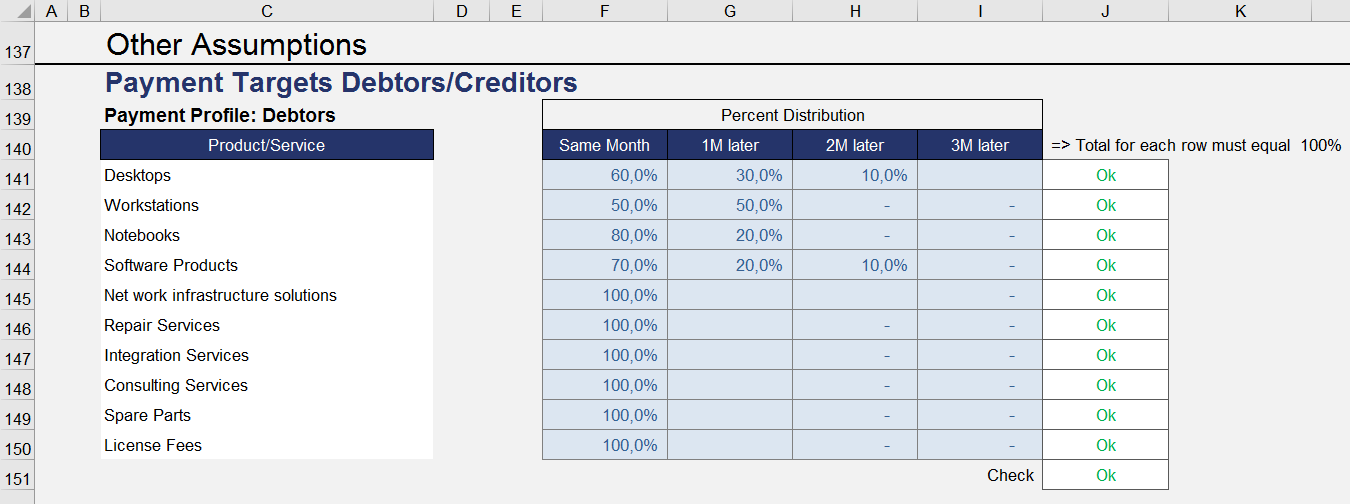
Excel-Financial-Model allows for detailed customization with regard to the payment targets of debtors and creditors. For each product/service different payment profiles can be defined (debtors / receivables).
Creditor payment profiles, set on the “Inputs” sheet, will only be used for cost of materials/packaging and for goods required. For all other cost items (for example, other direct costs or overheads) you can directly enter individual credit periods (in months) in column F (on the "Costs 02" and "Costs 03" sheets) by entering integers from 1 to 4 (or 0 for immediate cash payment => same month). |
a.) Taxes on Profit As tax regimes are country specific and extremely heterogeneous, Excel-Financial-Model has a straightforward implementation of tax calculation, which can be adapted individually where necessary. On the “Inputs” sheet, a tax rate (in percent) and a tax loss carried forward can be entered. The tax rate is applied to net profits before tax of each fiscal year. Advance tax payments can be entered for each planning year to straightening out cash flow effects of a single annual tax payment. Prepayment dates are quarterly, and you can set their exact timing (in months). In addition, you can define the date (month) for the tax payment in the following year. It is recommended to enter tax prepayments at the end or the planning process, as the actual tax burden depends on numerous model assumptions and inputs. The row below the input line for advance tax payments helps you choose appropriate amounts for the prepayments, as it shows tax payable according to the model’s calculations.
b.) VAT/GST/Sales TaxIf no sales or input/output tax is applied, simply set rate 1 to rate 3 to 0%. When using input/output taxes you can change the descriptive term according to the appropriate country specifics. It is possible to choose between “Sales Tax”, “GST” for Goods & Services Tax or “VAT” for Value Added Tax. Define up to three different local input/output tax rates (besides a predefined zero rate), e.g. a standard rate and one or two reduced rates.
You can set different options for claiming and paying VAT/GST etc. Select an accounting basis for claiming and returning your VAT/GST. The options are the invoice or payments basis. Invoice basis (aka imputed taxation) Using the invoice basis, you account for VAT/GST at the end of the taxable period when you issued an invoice to your customers or received an invoice from your supplier. You will pay the amount of VAT/GST shown on the invoices you've given to your customers (whether you've received a payment or not), and claim a credit for the amount of VAT/GST shown on tax invoices you've received from your suppliers (regardless of whether you've paid your supplier or not). Payments basis (aka actual taxation) Under the payments basis you account for VAT/GST at the end of the taxable period when you make or receive the payment. This helps you manage your cash flow because you only pay VAT/GST after you've received the payment from your customers, and you only claim VAT/GST for the purchases and expenses you've paid for. Filing frequency / intervals You can set the payment day interval when VAT/GST is paid to or refunded by state/tax authority (filing frequency). Select one of the five options: 1. Monthly, 2. Bi-Monthly, 3.Quarterly, 4. Semiannual or 5. Annual. Finally, choose the rates applied for a.) cost of materials/packaging and goods and b.) all other non-payroll expenses (other operating expenses, overheads etc.). If there are items within these groups with mixed rates or if not for all positions input/output tax is applicable enter a percentage of the amounts which are subject to VAT, GST, Sales Tax etc. Output tax rates for products/services have to be entered in the products and services assumptions section. Enter input tax rates for capital expenditures on the “Capex” sheet. Percentage and tax rate can be set individually for each item. |
1. For sources and uses calculation and overview (on summary 01 sheet), the number of months to be calculated/shown, can be entered and changed at any time. In case the number of months entered is longer than the model duration (based on your timing assumptions), you will get a warning/error message. 2. The interest rate for bank deposits (cash) can be set (interest receipts). 3. In addition you will find an option to switch on/off inventory planning globally. 4. Finally it is possible to plan further P&L and Balance Sheet items (for example extraordinary expenses, accruals, changes in advances received, advance payments, etc.) Detailed input options can be found at the bottom of the “Inputs” sheet. The table within the section “Miscellaneous” simply gives an overview of the figures on an annual basis. It is formatted and integrated for (the optional) printing of the “Inputs” sheet. |
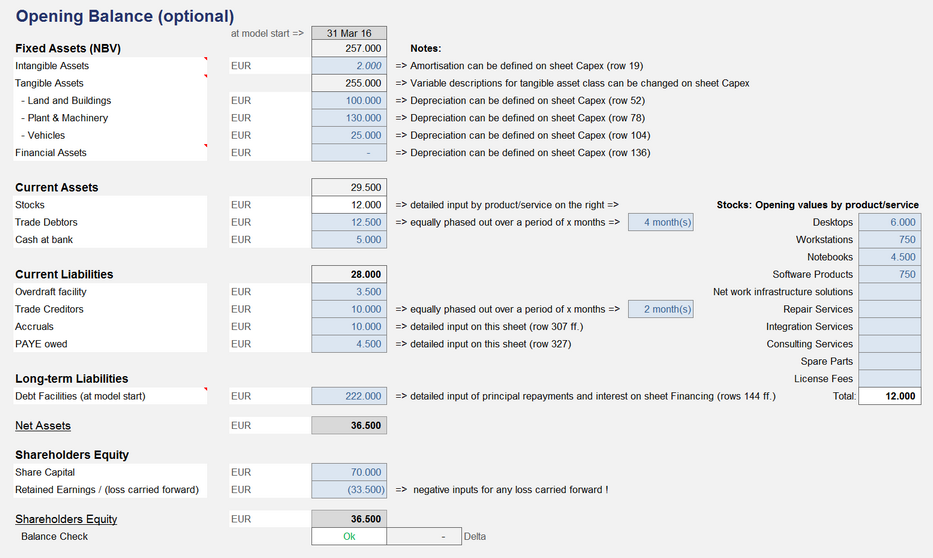
For existing companies with a financial history, enter all the necessary initial values. Check the control cell “balance check” just below the opening balance input cells, to make sure the opening balance is balanced. If the control cell does not show “OK”, the delta is indicated to help you review the values entered. For new projects or start-up companies with no initial values leave input fields blank or set to zero. |


